
by JuliannaKunstler.com
START HERE:
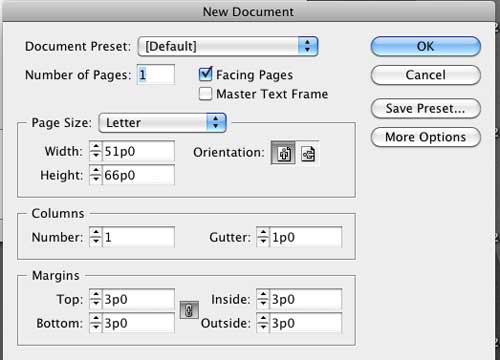
Open a new document in Adobe InDesign.
Page size: LETTER

You see a blank sheet with margins.
Tool box is on the left.
Palettes are on the right.

Save the document in the same location as the images that you are going to use..

Use Rectangle frame tool and draw a "holder for your first image (original photo).

You can resize and reposition your frame at any time using Selection tool (black arrow).

To place an image inside the frame:
* Frame is selected
* File >Place
*Browse to you folder where you saved your images for this assignment
Don't be scared if you see that the image does not fit the frame you drew!


Use Direct Selection tool (white arrow) - it edits the content of a frame.
Click on the photo inside the image frame.
You will see the boundaries of your image.
Resize the photo holding SHIFT on your keyboard (to keep proportions intact).
Adjust the frame (using Selection tool).


To add more images we need to add more image frames.
Select Rectangle frame tool again.
Click once on the page.

A window will pop up with the dimensions of the last rectangle that you created.
You want to keep the same height, you will change the width later. So...
Click OK

File > Place ....... image1.jpg

Resize the image (Direct Selection tool)


Adjust the width of the frame (Selection tool)

Add another frame and place image2.jpg into it.
Adjust the size of the image and the with of the frame.
All 3 images have same height right now.
You need to align them.

Select all images using Selection tool
At the menu bar: click ALIGH button (the first one shown)

Now draw image frames for the next image:
image3.jpg

Add images:
image4.jpg
image5.jpg
image6.jpg
Next, you need to align them and spread out evenly.
* Place image4.jpg so its left side aligns with the original.
* Place image6.jpgso its right side aligns with image2.jpg

* Select all four images
*Align and distribute as shown:
![]()

This is what it should look like.
Save!
Page 1 is done!

Now it's time to create a page for your next image.
You want to have the same layout.
Good news: you can reuse the image frames you already have, just place new pictures inside.
Open Pages palette.
You see your page in there (a thumbnail preview)
Right-click on it and choose Duplicate Spread.

That will duplicate your page.
Double-click on the thumbnail to open the page.

Select the first image frame.
File > Place
Place your next original photo in here.
Then adjust the image size and the frame.
Repeat the steps for the rest of them.

Do not forget to align your images.

Duplicate the spread again.

Place you next set of images in there.

Next step is to sign your pages.
You are going to add your signature to the MASTER SPREAD in the Pages palette.
Once you add signature to Master pages - it will be automatically placed on your pages.
Master pages like a template that shares its properties with selected pages.
Double-click in Master page.

Use Type tool and drag a text box at the bottom of the Master page

Type your name

Use Character palette to change a font or a size of your text.
Window > Type > Character

Select Selection tool.
Hold Option button on your keyboard and drag your signature onto the other page of the spread.
This will duplicate your signature.

Return to your work pages:
Double-click on page 1 in the Pages palette.
Preview the changes.
File > Save

To save it as PDF (optional):
File > Adobe PDF Presets > Smallest File Size