julianna kunstler logo
wooden face

displace filter
Instagram icon

by JuliannaKunstler.com

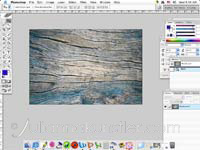
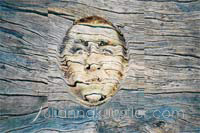
Displace filter allows you to wrap one image around another one.

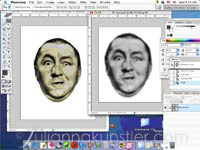
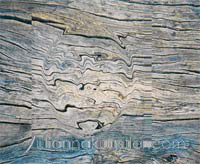
You will need to create a Displacement map - a grayscale version of an image saved as a Photoshop file.

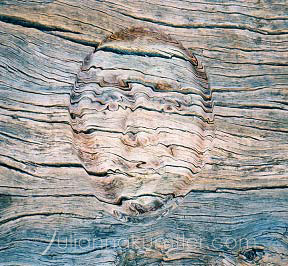
The Displace filter then uses the displacement map essentially as an applied texture.

The black areas are the low points and the light areas are the high points of the contours of the original image.

GALLERY

wooden face

STEPS

Displacement map

faces

Open the stooges file.

face selection

Isolate the middle face by removing everything around it.

(Make a selection of the face and delete the background).

Crop the image to fit the face.

duplicate file

Duplicate the image:

Image > Duplicate

save and close the original file. You are going to make a displacement map out of the newly created file.

Convert the duplicate to a grayscale:

Image > Mode > Grayscale

Flatten image

Soften the contrasts. We need smooth transitions between values - less contrast is better.

Filter> Blur > Gaussian Blur

Crop the image again to eliminate as much blanc space as possible.

Save the new image as .psd file (remember where you saved it and the name of the file)

Close it.

Displace filter

wooden texture

Open the wooden texture image.

Make a rectangular selection in the center (approximately the dimensions of the saved FACE file).

Edit > Copy > Paste.

When you paste a selection, it automatically creates a new layer and deselects it at the same time. We need this selection to continue be selected. The selection boundaries will define the area that we want to apply the displace filter to.

The easiest way to select something in a layer with no background is to select that background, then invert the selection:

Use Magic Wand tool and click on the empty area outside the rectangle to select it.

Select > Inverse

displace filter

Now it's time to apply the displacement map to the selected area of wood.

    • Filter > Distort > Displace
    • OK to default settings
    • Browse to your face grayscale image
    • click OK
    • Experiment with settings a few times to get the best wrapping effect.

As a side effect - you will get an ugly rectangle around the face. You are going to remove it in the next step.

Open the ORIGINAL (color) face image

Drag the face over the distorted wooden face file. Close the original.

Free Transform the face to match the size of the distorted face.

Now we need a selection of the actual face to remove the ugly rectangle around the distorted face.

Click with the Magic Wand outside the face.

Switch to the distorted (wooden) face layer and hit Delete.

layer blending mode

Return to the top "face" layer.

Use one of the layer blending modes (like overlay, etc… whichever works better for your images)

Save.

Done.

wooden face
...