STEP 1: planning

Planning is important!
Narrow down the topics and concepts you want to assess.

How many questions are there for each topic?
Even though you can always add more questions later, but for the first form it is better to have the exact number.

Lay out the order of pages:
Topic pages are the pages where you will place the study-guide information, explanation of the concepts, techniques, etc. Basically, this is where you place the summary of the topic.
Question page is the pages where you place your question, and, based on the answer, student will go to the next question page (if the answer is correct), or not.

Wrong answer pages:
In case a student's answer is incorrect, he will be forwarded to a page, that will provide some additional information about this particular question.

Here is the idea behind the study-guide form:
1. Student lands on Topic 1 page, where he reads all necessary information about the topic. After reading it, the student clicks the NEXT button.
2. Student lands on Question 1 page. This page has the question itself, and the multiple choice options.
If the student's answer is correct, clicking on NEXT button will take him to Question 2 page.
If the answer is incorrect, student will be forwarded to the Wrong answer page, where he will review the information pertaining to the question.
After the Wrong answer page, student is directed back to Question 1 page, where he answers the question again.
3. Once the student is at Question 2 page, the steps repeat: either he proceeds to the next topic - Topic 2 page - or is directed to the Wrong answer page for question 2.
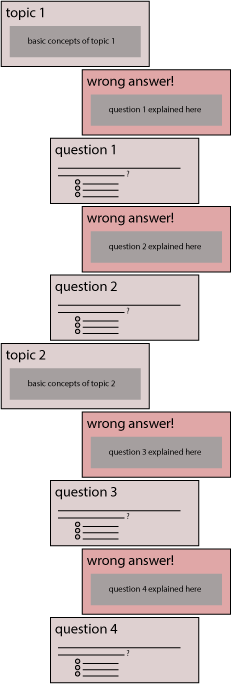
This is what the order of the pages looks like.
Each topic starts with a Topic page.
![]()
Next page is a Wrong answer page - landing page for all incorrect answers for question 1.
![]()
Next is the Question page with multiple choice option.
![]()
Next page is a new question or a new topic page.