julianna kunstler logo
painting with light

digital photography
Instagram icon
 

by JuliannaKunstler.com

Here’s the basic idea of where we are doing:

  • Start with a good, clean image.
  • Duplicate layers as needed to allow for light, dark, and neutral adjustments.
  • Push individual layers to extremes using adjustment layers, looking for desirable details.
  • Paint on the adjustment layer masks to select only what you want.
  • Add finishing touches - tints, borders, etc.

GALLERY

painting with light

STEPS

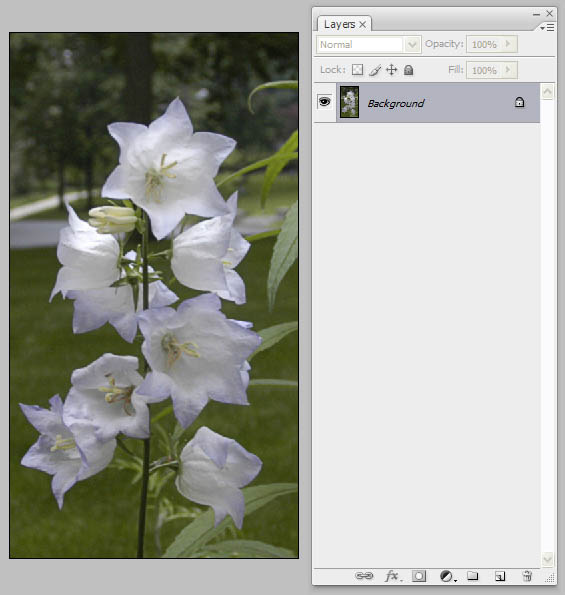
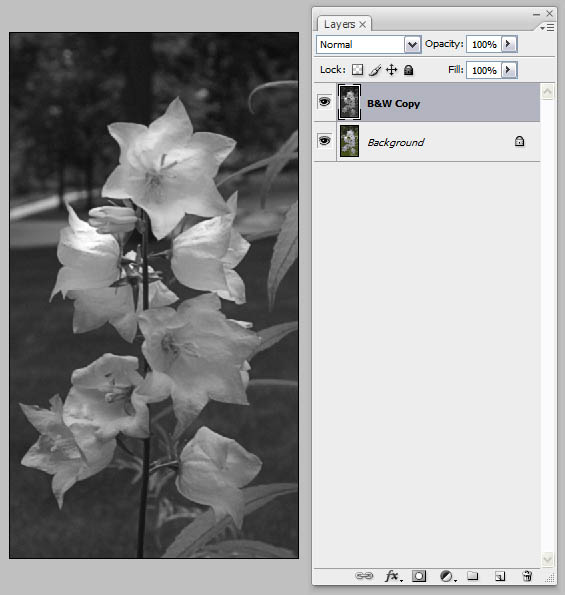
1) Image Prep & Clean up

Open your image in Photoshop, and duplicate the Background layer.

Call the duplicate ‘B&W Copy’.

On the B&W Copy layer, make any adjustments to the core image you like (levels, color, etc).

You want to end up with a technically good exposure, but not a final image.

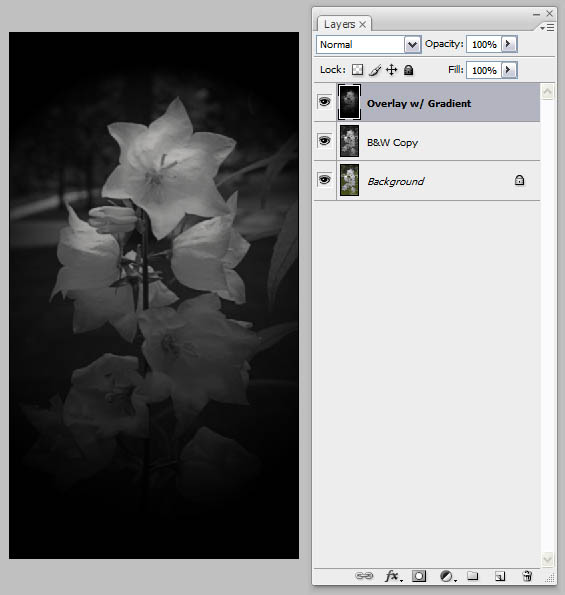
2) Black and White Conversion

After you are done with the B&W Copy cleanup,

it’s time to convert to black and white.

Image > Adjustments > Desaturate


3) Duplicate the B&W Layer

Make a new copy of the B&W Copy and call it Overlay w/ Gradient.

Add a layer mask.

4) Make an overlay mask

Here’s the first tricky part - creating your overlay mask. In most situations, you can simply add a layer mask to isolate parts of an image.

In this case, however, we will be setting the blend mode to Overlay, so anything that is masked won’t be affected.

What we need to do is actually blacken parts of the layer that we don’t want highlighted.

To do this, we need to use a temporary layer filled with black *underneath* the Overlay w/ Gradient layer.

4a) Create a black fill layer
Just below the Overlay w/ Gradient layer, create a new layer filled with black.

4b) Paint the overlay mask
On the Overlay w/ Gradient layer mask, begin painting with a soft, black brush on low opacity. Slowly take away the parts that will be darkened or hidden layer.

4c) Merge the result
Once you are happy with the mask, select both the Overlay w/ Gradient layer and the black filled layer below it and merge [Layer > Merge Layers or Ctrl/Cmd + E]. This should leave you with a single layer and no mask.

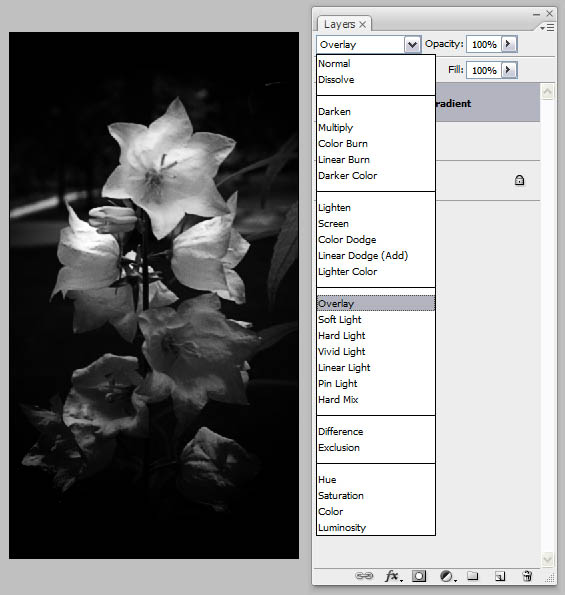
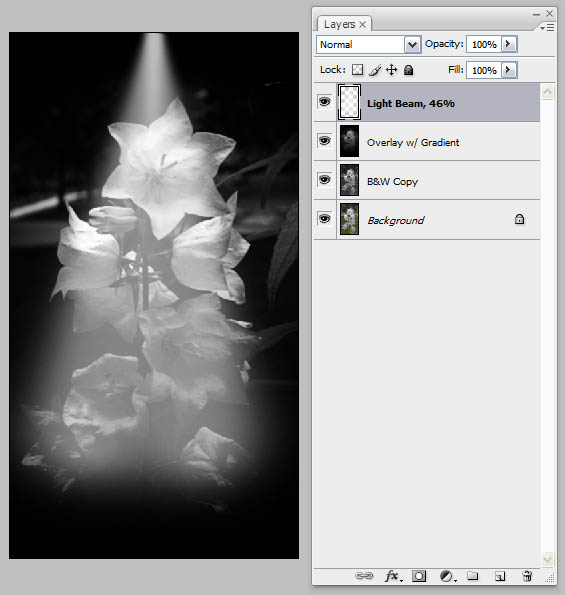
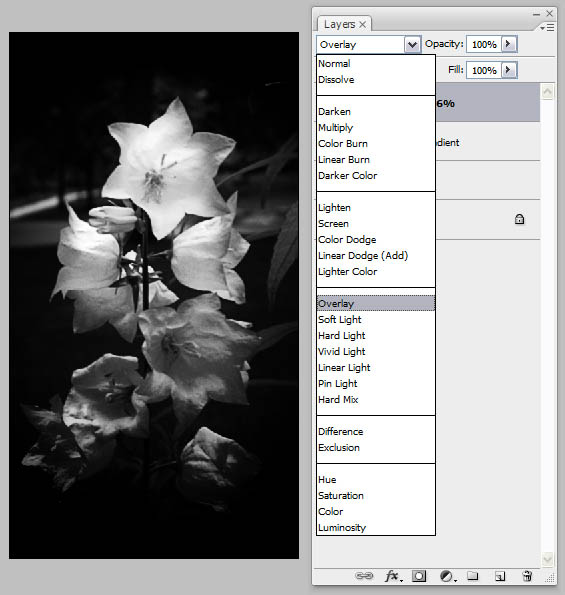
5) Set Overlay Mask to Overlay Mode

That’s pretty straightforward… change the blend mode of Overlay w/ Gradient to well… Overlay.

The image should look a little more interesting right now.

There should be much more dynamic range, and some nice, deep shadows.

In the next step, we’ll create a little more drama with some additional lighting effects.

6) Create a Light Beam layer

Create a new, blank layer above the Overlay w/ Gradient layer, and call it Light Beam.

Using whatever method you like, create some soft, white light beams.

For this example image, I used the Polygon Lasso tool with about 20px of feathering to draw a triangle.

I then filled with white, and blurred it (Filter > Blur > Gaussian Blur 29)

Set the Light Beam layer blend mode to Overlay, and lower the opacity to taste. I used 46%.

7) Survey the results!

At this point, it’s important to look at what you have so far.

For my example, the top flower is centered and highlighted, with other elements lower down the stem fading to darkness.

Summary
We are now done with the basics of the technique.

“But wait,” you say. “Where’s the painting?”

Well, remember when we did the masking and the light beams?

That’s the very beginning of where you can go. We just created the beams to a general shape, but you could have painted them for specific highlights.

8) To get a nicely toned monochrome image, simply add a blank layer at the top of everything else, and fill with a color of your choosing.

Set the blend mode of that layer to Color, and reduce the opacity or fill to suit your tastes.

For my version, I used a kind of light tobacco color, and set the opacity at 50%.

Finally, I added an oval vignette layer mask to my B&W Copy layer, just to give it that old portrait feeling (this also requires a black filled layer underneath so the original doesn’t show through).

Keep using this technique, and you’ll find all kinds of variations. Use any combination of the steps you like. Leave some out, duplicate others, and substitute your own. The key is to experiment.

...