


Three-Layer Pendant
intro to metals
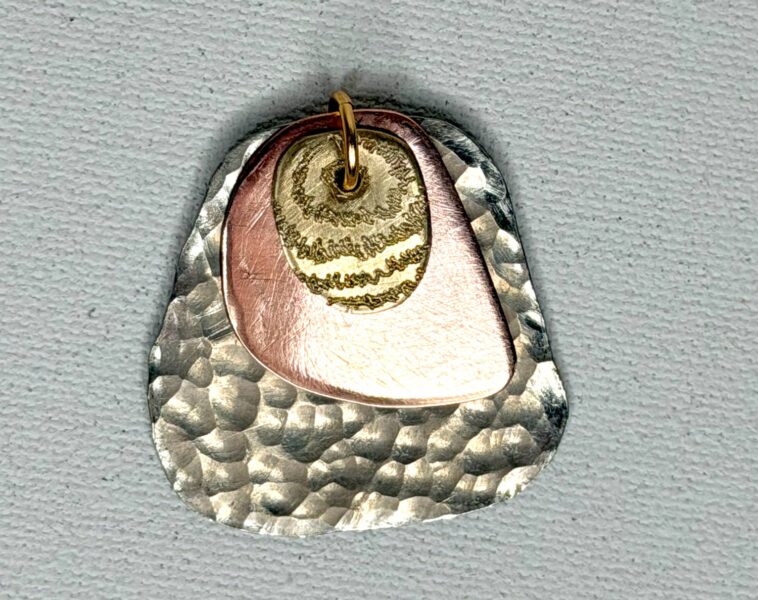
In this introductory jewelry-making project, you will design and create a three-layer pendant using three different metals: nickel silver, copper, and Nu-Gold (jeweler’s brass).
Each metal will receive a different surface treatment to create contrasting colors, textures, and finishes. You will practice basic
metalworking techniques, including sawing, filing, drilling, hammering, sanding, polishing, and engraving.
Project Requirements
- Create a pendant consisting of three overlapping metal shapes.
- Use nickel silver, copper, and Nu-Gold.
- Make each layer a different size so all three metals remain visible.
- Apply a hammered texture to the nickel silver.
- Give the copper a smooth, polished finish.
- Decorate the Nu-Gold with an engraved design.
- Connect all three pieces using a jump ring.
- Make sure all edges are smooth and the pendant is safe to wear.
Materials and Tools
- Nickel silver, copper, and Nu-Gold sheet metal
- Paper and pencil
- Scissors
- Masking tape
- Permanent marker
- Metal shears
- Jeweler’s saw and saw blades
- Bench pin and clamp
- Bench vise
- Metal files and needle files
- Sandpaper in various grits
- Center punch and hammer
- Dremel rotary tool with metal drill bits
- Ball-peen hammer and steel bench block
- Polishing wheel and polishing compound
- Engraving tool or rotary engraving attachment
- Jump ring and jewelry pliers
- Safety glasses
STEPS
Step 1: Design Your Pendant

Start by sketching a pendant design consisting of three overlapping shapes. The largest shape will form the background, the medium shape will create the middle layer, and the smallest shape will be placed on top.
Consider the arrangement of the shapes, their proportions, and how much of each metal will remain visible.
- Keep the shapes simple and easy to cut.
- Organic, rounded shapes work well for this project.
- Make sure the three layers create a unified composition.
- Plan the location of the connecting holes.

Cut out the paper template to check the overall size and shape of your design.
Step 2: Prepare the Metal

Cut three rectangular pieces of sheet metal using metal shears. Each piece should be large enough to accommodate its planned shape.
The three metals have different colors and properties:
- Nickel silver: silver-colored metal alloy used for the bottom layer.
- Copper: reddish metal used for the middle layer.
- Nu-Gold: golden-colored brass alloy used for the top layer.
Arrange the pieces according to your design and check that the sizes will allow all three metals to be visible.
Step 3: Transfer the Design

Cover the surface of each metal sheet with masking tape. Overlap strips of tape if needed to cover the entire design area.
Place your paper template on the taped metal and trace its outline with a permanent marker.
Remove the paper template. The outline should now be clearly visible on the masking tape.

Mark the planned location of the connecting hole. Repeat the process for all three metal pieces.
Masking tape provides a convenient surface for drawing and helps protect the metal from scratches during cutting.
Step 4: Cut Out the Metal Shapes

Secure a jeweler’s bench pin to the worktable. The V-shaped opening supports the metal while allowing the saw blade to move freely.

Place the metal on the bench pin with the cutting line positioned over the opening.
Using a jeweler’s saw, carefully cut along the marked outline.
- Keep the saw blade vertical.
- Use smooth, controlled up-and-down strokes.
- Do not force or twist the blade.
- Turn the metal gradually when following curves.
- Keep your fingers away from the path of the blade.

Repeat the cutting process for all three shapes. Remove the masking tape after cutting.
Step 5: File and Smooth the Edges

Freshly cut metal has rough, sharp edges that must be smoothed before continuing.
Secure one metal piece in a bench vise, leaving the edge exposed.

Use a metal file to remove rough saw marks and refine the shape. Work carefully around the entire perimeter.

Use a smaller needle file to reach tight curves and to smooth the edges of the drilled holes.
Check the edges with your fingers carefully. They should feel smooth, with no sharp points or burrs.
Repeat for all three pieces.
Step 6: Prepare and Drill the Holes
Arrange the three metal shapes in their final overlapping
composition.

Check the position of the connecting holes. The holes must
align so that all three pieces can be joined with a jump ring.
Mark each hole with a center punch to create a small indentation
that will help keep the drill bit from slipping.
Secure each metal piece on a suitable drilling support and use
a Dremel rotary tool with a metal drill bit to drill the hole.
Drill each piece separately. Use a drill bit appropriate for
the thickness of the metal and the size of the jump ring.
Remove any sharp burrs around the holes using a needle file
or deburring tool.
Step 7: Hammer the Nickel Silver

The largest, nickel-silver layer will receive a hammered texture. This creates an uneven, reflective surface that contrasts with the smooth copper and engraved Nu-Gold.
Place the nickel-silver piece on a steel bench block.
Using the rounded end of a ball-peen hammer, gently tap the surface to create small, overlapping indentations.
- Use controlled, consistent hammer strikes.
- Move across the surface to distribute the texture.
- Overlap the hammer marks for a unified appearance.
- Avoid striking too hard, which may distort the shape.
Continue until the entire visible surface has a consistent hammered texture.
Step 8: Sand and Polish the Copper

The copper layer will have a smooth, polished finish.
Begin sanding the copper to remove scratches and marks left from cutting and handling.
Start with a suitable sandpaper grit and gradually progress to finer grits. Sand evenly across the surface.
Each finer grit should remove the scratches left by the previous grit.
Once the surface is smooth, polish the copper using an appropriate polishing wheel and compound.

Continue polishing until the copper develops a smooth, reflective finish.
Clean the metal to remove any remaining polishing compound.
Step 9: Engrave the Nu-Gold

The smallest layer will feature an engraved decorative design.
Plan a pattern using lines, shapes, or repeated marks. The engraving should complement the overall pendant design.
Use an engraving tool or a suitable rotary engraving attachment to create the design on the Nu-Gold surface.
Work slowly and carefully. Vary the direction and spacing of the engraved marks to create interesting patterns.

Clean the surface and remove any remaining burrs.
Step 10: Assemble the Pendant

Arrange the three finished metal shapes in the correct order:
- Hammered nickel silver on the bottom
- Polished copper in the middle
- Engraved Nu-Gold on top
Align the holes and insert a jump ring through all three pieces.
Use jewelry pliers to close the jump ring securely. Open and close the ring by twisting its ends sideways, rather than pulling them apart.
Check that the layers hang properly and that the pendant has no sharp edges.
Attach the pendant to a cord or chain.
Final Checklist
- Three different metals are used.
- All three layers are visible.
- The nickel silver has a hammered texture.
- The copper has a smooth, polished finish.
- The Nu-Gold has an engraved design.
- All edges and drilled holes are smooth.
- The pendant is securely assembled.
- The finished design demonstrates balance, contrast, and unity.
Safety Reminders
- Wear safety glasses when cutting, filing, drilling, hammering, or using rotary tools.
- Secure metal pieces before drilling. Never hold them in your hand while drilling.
- Keep fingers away from saw blades and cutting tools.
- Use rotary tools and polishing equipment only with instructor supervision.
- Secure long hair and avoid loose clothing or jewelry around rotating equipment.
- Use appropriate ventilation and dust collection when sanding or polishing metal.
- Nickel silver contains nickel and may cause skin reactions in sensitive individuals.