


plaster sculpting
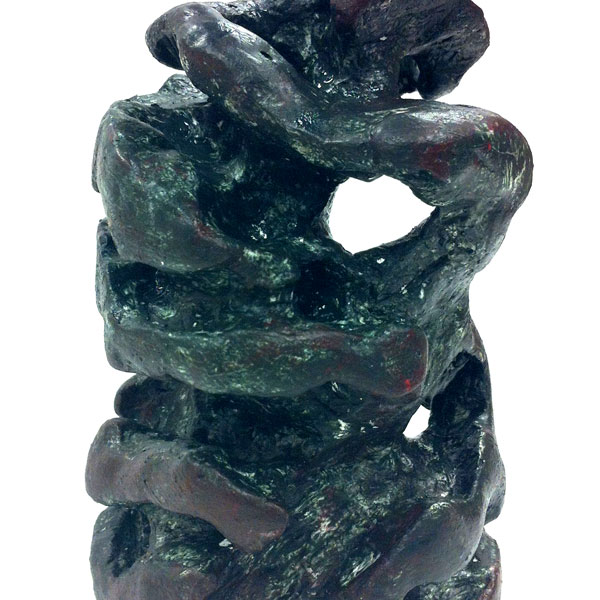
Exploring Negative Space
WI State Standards:
- AA Cr10h
Investigate: Engage in critical thinking, problem solving, and research through elements and principles of art and design studio practices and processes.
(aesthetics / problem solving) - AA Cr11h
Plan: Formulate original concepts by practice, experimentation, and revision. (planning/experimentation) - AA Cr12h
Make: Create works of art that introduce students to media, care of tools, and basic craftsmanship skills.
(skills)
Learning objectives
- Understand the difference between additive and subtractive sculpture.
- Construct a simple mold for casting plaster.
- Practice safe plaster mixing and pouring procedures.
- Use carving tools, rasps, and sandpaper to shape plaster.
- Develop organic forms through subtractive carving.
- Transform random cavities into intentional negative spaces.
- Experiment with different surface textures.
- Consider a sculpture from multiple viewpoints.
Let’s explore subtractive sculpture by carving a small block of plaster.
You will begin by constructing a simple mold and placing random pieces of clay inside it. As you pour plaster around the clay, the pieces will become embedded in the block.
Once the plaster has hardened, you will remove the clay to reveal unexpected cavities and openings. Your challenge is to transform these random spaces into an intentional abstract sculpture by carving, enlarging, connecting, and refining the forms.
Focus on the relationship between positive and negative space, organic shapes, surface textures, and the movement of the viewer’s eye through the sculpture.
Materials
- Plaster of Paris
- Flexible plastic sheets or disposable plastic cups
- Cardboard for mold bases
- Packing tape or hot glue for securing molds
- Reusable, non-hardening modeling clay
- Mixing containers and stirring sticks
- Measuring cups
- Carving & modeling tools
- Rasps and files
- Sandpaper
- Brushes for removing plaster dust
- Safety glasses and appropriate dust protection
tools
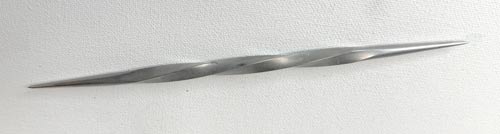
Double-ended pointed modeling tool, sometimes called a sculpting stylus. Both ends taper to fine points, and the twisted center provides a better grip.
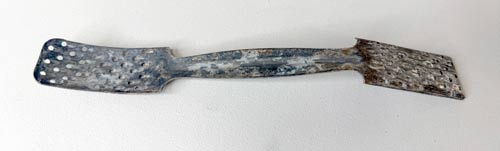
Double-ended plaster rasp / scraper
The perforated surfaces are designed to abrade and remove material. Good for reducing high areas, flattening surfaces, and rough shaping.
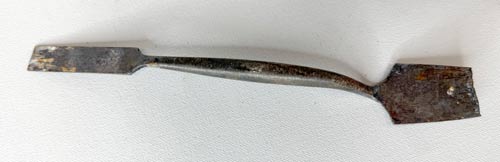
Double-ended sculpting spatula, also called a plaster modeling spatula or flat modeling tool.
It has two flat blades of different widths, making it useful for both applying and removing material.
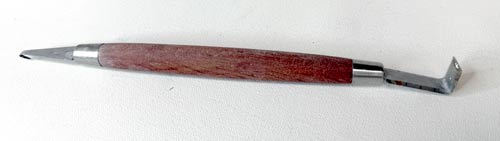
Double-ended modeling and carving tool, with two different working tips.
Pointed end: Used for incising lines, creating fine details, marking outlines, and making small indentations in soft plaster.
Angled flat blade: Used for scraping, trimming, beveling edges, and refining small cavities. Its bent shape makes it useful for reaching recessed areas.
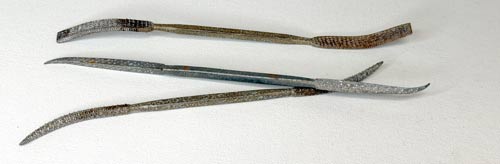
Double-ended plaster rasp, also called a sculptor’s rasp or riffler rasp.
Both ends have raised cutting teeth and taper toward the tips, making this tool especially useful for shaping plaster.
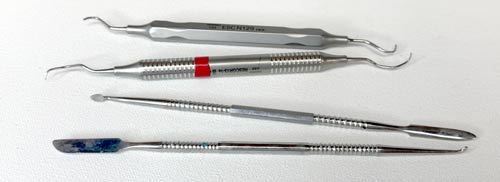
Dental tools.
They’re excellent for fine detailing and working inside small cavities.
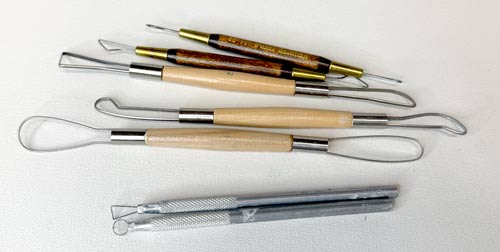
Wire Loop and Ribbon Carving tools.
Loop and ribbon tools are used to remove material from soft plaster by scraping, gouging, and hollowing. Different loop shapes create different types of cuts. Rounded loops are useful for carving curved grooves and cavities, while angular loops create sharper edges and more defined channels. Larger loops remove material from broader areas, while smaller loops are used for details and refining surfaces.
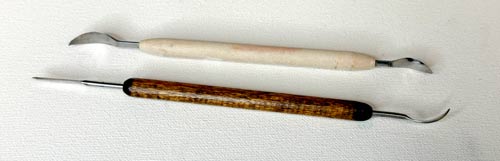
Curved Carving and Detailing Tools.
Curved carving tools are used for scraping, shaving, and refining plaster surfaces. Wider curved blades help round edges and create smooth transitions between forms. Pointed and hooked tips are useful for incising lines, carving narrow grooves, cleaning small cavities, and adding fine surface details.
Project Requirements
Your finished plaster sculpture must include:
- At least three intentional cavities or recessed areas developed from the embedded clay.
- At least one cavity that has been enlarged, reshaped, or connected to another.
- A combination of rounded and angular or sharply defined carved areas.
- At least three different surface textures.
- Interesting positive and negative spaces.
- A composition that works from multiple viewing angles.
- Careful craftsmanship and appropriate use of carving tools.
- A stable base or position for display.
Important: This is an experimental workshop. Your goal is to explore carving techniques and discover how removing material can transform a simple plaster block into an interesting abstract sculpture.
STEPS
Step 1: Prepare Your Mold
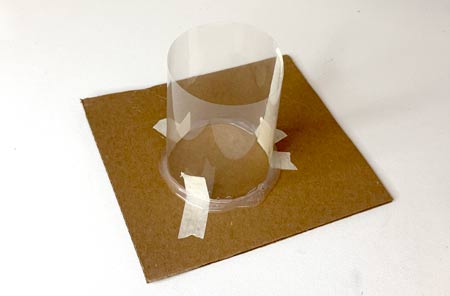
Construct a small mold using a flexible plastic sheet secured to a cardboard base. Shape the plastic into a cylinder or another simple form, and seal the edges to prevent plaster from leaking.
Alternatively, you may use a disposable plastic cup as your mold.
Keep your mold relatively small. This is a practice project, and you should be able to explore several carving techniques without spending too much time removing large amounts of plaster.
Make sure your mold is stable and does not leak before pouring.
Step 2: Add Clay Pieces
Tear several irregular pieces of modeling clay and place them inside your mold.
- Use different sizes and shapes.
- Place some pieces along the bottom or against the sides of the mold.
- Save a few additional pieces to insert during the plaster pouring process.
- Avoid arranging the clay into a recognizable object.
The purpose is to create unexpected cavities and negative spaces that you will later develop through carving.
Remember that the clay will be removed. Think of it as a temporary placeholder for the empty spaces inside your sculpture.
Step 3: Mix and Pour the Plaster
Follow your teacher’s instructions and the manufacturer’s recommended proportions for mixing plaster.
- Add the measured amount of water to a clean mixing container.
- Gradually sprinkle plaster into the water.
- Mix gently until the mixture is smooth and free of dry lumps.
- Carefully pour the first layer of plaster into your mold, covering the initial clay pieces.
- Add a few more irregular clay pieces near the sides of the mold, partially embedding them in the plaster.
- Finish pouring the plaster until the mold reaches the desired height.
- Gently tap the outside of the mold to help release trapped air bubbles.
Work efficiently. Plaster of Paris begins setting quickly, so all materials and clay pieces should be prepared before mixing.
Safety: Never pour leftover plaster into the sink. Allow unused plaster to harden and dispose of it according to your teacher’s instructions. Never allow plaster to harden directly against your skin, as the setting reaction produces heat.
Step 4: Remove the Mold and Clay
Allow the plaster to harden sufficiently before removing the mold. Follow your teacher’s instructions for when the casting is ready to handle.
Carefully peel away the plastic or cut open the disposable cup.
Use wooden modeling tools to remove the embedded clay pieces and reveal the cavities.
Examine your plaster block from all sides. Look for interesting relationships between the openings, solid areas, and outer edges.
Think about:
- Which cavities have the most interesting shapes?
- Can any of the openings be connected?
- Where could you remove additional plaster?
- Which areas should remain solid to support the structure?
Do not begin carving randomly. Take a moment to consider how the existing cavities could become part of a unified sculpture.
Step 5: Explore Carving Techniques
Before developing your sculpture, experiment with different carving tools and techniques.
Scraping
Remove thin layers of plaster to level or smooth a surface. Scraping can also create subtle surface marks.
Gouging
Use a carving tool to remove material and create grooves, channels, or deeper recesses.
Hollowing
Gradually remove material from the interior of a cavity to enlarge or reshape the negative space.
Rasping
Use a rasp or file to remove material from larger areas, reshape edges, and develop the overall form.
Beveling
Carve away a sharp edge to create an angled transition between two surfaces.
Rounding
Soften corners and edges to create smooth, flowing organic contours.
Texturing
Use repeated tool marks, scratches, grooves, or stippling to create different surface qualities.
Sanding
Use sandpaper to refine selected areas and create smooth surfaces that contrast with rough textures.
Important: Work slowly and remove small amounts of plaster at a time. You can always carve away more material, but you cannot easily replace what you remove.
Use hand tools as demonstrated by your teacher. Keep tools directed away from your hands and body. Avoid creating airborne plaster dust, and follow classroom safety procedures when sanding or cleaning.
Step 6: Transform the Cavities
This is the most important part of the project!
Do not simply clean out the clay and leave the holes as they are. Use the original cavities as starting points for developing a new sculptural form.
Experiment with the following ideas:
- Enlarge selected openings.
- Connect two cavities with a carved channel.
- Change the shape or direction of an opening.
- Create bridges of plaster between negative spaces.
- Round or sharpen the edges of cavities.
- Carve grooves that lead toward or away from the openings.
- Remove material from the outer edges to change the silhouette.
- Contrast deep recesses with raised or projecting forms.
Consider how the positive forms (solid plaster) and negative spaces (openings and cavities) interact with each other.
Turn your sculpture frequently as you work. Your composition should be interesting from several viewpoints, not just from the front.
Remember: Leave enough plaster between cavities to maintain structural strength. Thin bridges and narrow edges can break easily.
Step 7: Develop Surface Textures
Explore how different carving tools can create a variety of surface textures.
Your sculpture must include at least three distinct textures.
Possible textures include:
- Smooth, polished-looking surfaces
- Rough, chipped surfaces
- Parallel grooves or carved lines
- Crosshatched marks
- Small repeated indentations
- Irregular scratches and tool marks
- Contrasting smooth and deeply textured areas
Use texture intentionally. Think about how it can emphasize the form, create contrast, or direct the viewer’s attention toward a particular cavity or opening.
Avoid covering every surface with the same texture. Leaving some areas smooth can make the textured areas more noticeable.
Step 8: Refine and Finish
Examine your sculpture carefully from all sides.
- Refine the transitions between solid forms and negative spaces.
- Remove distracting bumps and unfinished edges.
- Check for fragile areas that might break.
- Use sandpaper selectively to smooth areas that need a softer finish.
- Make sure your sculpture has a stable position for display.
- Remove loose plaster particles and clean your workspace.
Leave your sculpture unpainted. The natural white plaster will emphasize the shapes, shadows, carved openings, and contrasting surface textures.
Your finished sculpture should demonstrate how a simple plaster block can be transformed through the careful removal of material.
Assessment
This workshop focuses on technical exploration, experimentation, and creative problem-solving.
- Mold Construction and Casting (15 points): Proper preparation, clay placement, and successful casting.
- Carving Techniques (25 points): Safe and effective use of tools and evidence of experimentation.
- Negative Space (25 points): Intentional development of cavities, openings, and sculptural forms.
- Surface Textures (20 points): At least three different textures used effectively.
- Craftsmanship (15 points): Careful finishing, structural stability, and completion.
Total: 100 points
Reflection Questions
- How did the randomly placed clay pieces influence the final design of your sculpture?
- Which carving tools and techniques did you find most effective?
- How did you transform the original cavities into intentional negative spaces?
- How do the different textures affect the appearance of your sculpture?
- What would you do differently when carving a larger plaster sculpture?