


cardboard workshop
How to…
Cardboard Construction Techniques
A cardboard sculpture should demonstrate several different ways of manipulating cardboard.
1. Box Construction

The main structure should be created primarily through hollow construction rather than stacking solid layers of cardboard.
Use cardboard planes to create enclosed forms.

A basic form may require:
- front
- back
- sides
- top
- bottom
Not every form needs to be a rectangular box. The same construction idea can be used with irregular shapes.
For example, you can cut two matching irregular side shapes and connect them with cardboard strips to create a hollow three-dimensional form.
This technique is especially useful for shoes, handles, appliances, cameras, tools, and other irregular objects
2. Score and Fold

The direction of the corrugation affects how cardboard bends. Before scoring, look at the cardboard and determine which direction the corrugated channels (flutes) are running.
Always practice on scrap cardboard first.
Folding Along the Corrugation

When your fold line runs in the same direction as the corrugation, the cardboard will naturally want to fold along one of the channels.
This usually creates the easiest and cleanest fold.
Folding Across the Corrugation

When your fold line runs across the corrugation, the internal flutes resist the fold.
This fold may be stiffer than a fold that follows the corrugation, but it provides a nice pattern inside the cut.
Don’t force it. Bend gradually to avoid tearing the outside layer.
Folding Diagonally

A diagonal fold crosses the corrugation at an angle, so different flutes are being bent at different points.
Diagonal folds can be more difficult to control, but they are useful for creating angled and irregular forms.
Remember: score, don’t slice!
You are cutting the surface layer to tell the cardboard where to bend, not cutting the piece into two parts.
The direction of the corrugation matters. Try folding along, across, and diagonally to the flutes. Each direction behaves differently.
2. Tabs
Tabs are extensions of a cardboard shape that help connect one piece to another. Plan your tabs before cutting out your shape, because the extra cardboard needed for the tab must be included in the original piece.
There are two ways we will use tabs:
1. Folded Tabs

A folded tab is an extra section of cardboard that is scored, folded, and glued to another surface.

Pay attention to which side of the cardboard to score!
Folded tabs are useful for connecting walls, sides, curved surfaces, and other parts of a constructed form.
2. Tab-and-Slot Connections

A tab-and-slot connection uses a tab that is part of one shape and fits into a matching slot cut into another piece of cardboard.

The slot should fit closely around the tab. Too large = loose connection. Too small = crushed cardboard and frustration.
Plan Before You Cut!
Before cutting out a cardboard piece, ask yourself:
How will this piece attach to the sculpture?
If it needs a tab, draw the tab before you cut.
Shape → Add Tabs → Cut → Score or Slot → Test Fit → Assemble
3. Bending Cardboard

Corrugated cardboard naturally resists bending in some directions.
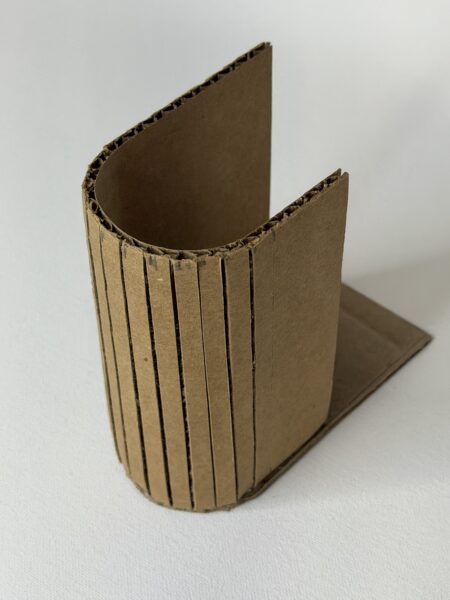
To create a controlled bend, carefully cut or score only the top surface layer of the cardboard.

Do NOT cut completely through the cardboard.
Once the surface has been scored, gently bend the cardboard along the line.
A single scored line creates a sharper fold.

Multiple parallel scored lines can create a gradual curved surface.
Experiment on scrap cardboard before using this technique on your sculpture.

If you completely remove the top layer – the cardboard becomes extremely flexible.

You can bend and roll it in any direction. (Along the flutes, of course).
4. Layering

Use layers of cardboard to create thickness and raised details.
Layering works well for:
- soles
- buttons
- knobs
- rims
- handles
- seams
- logos
- panels
- edges
- decorative details
Vary the number of layers to create different levels of relief.
Layering should help describe the structure of the object rather than simply decorate its surface.
5. Revealed Corrugation

Use the interior structure of the cardboard as part of your design.
Carefully remove areas of the outer paper surface to reveal the corrugated layer underneath.
You can also intentionally expose corrugated edges.
Use this technique selectively to create contrast and texture.

Score the top layer first to outline the to-be-exposed area. Then use a blade or tweezers to clean up the corrugation
The exposed cardboard should appear intentional rather than looking like damaged material.
6. Internal Supports

Large sculptures sometimes need support inside.
Create internal cardboard braces, ribs, crosspieces, or gussets to:
- prevent large surfaces from collapsing
- maintain the shape of curved forms
- support attached components
- strengthen weak areas
- hold walls and surfaces at specific angles

Gussets are small pieces of cardboard used to support and position another piece.
If you need a wall or other piece to be placed in a precise position, attach the gussets first.
When positioning the gussets, remember to leave enough space between them for the thickness of the cardboard wall.
Slide or place the wall against the gussets and glue it into position.

Gussets can also be used to hold walls at different angles. The position and angle of the gussets determine the angle of the attached wall.
Plan the support structure before closing your form. Once the outside surfaces are attached, reaching the inside can become difficult.
Good construction is not only about what we can see.
Sometimes the most important cardboard is hidden inside.