


intro to cardboard
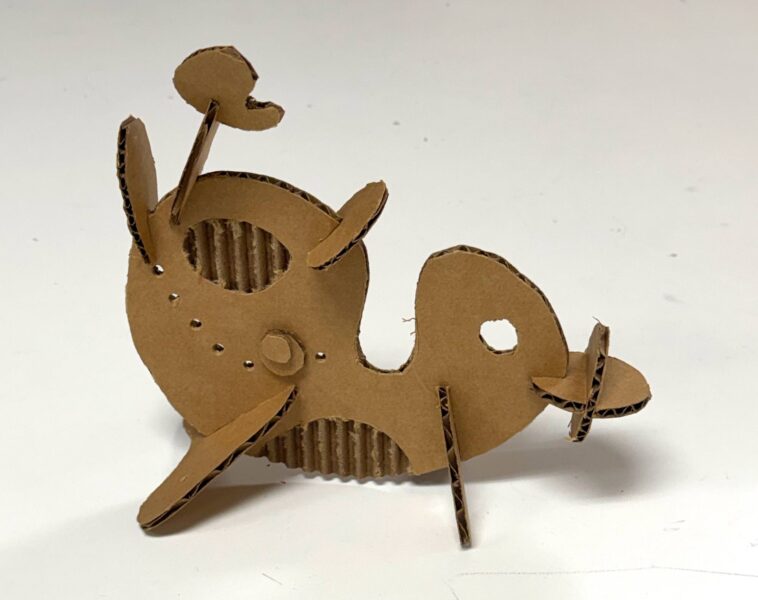
Organic Abstract Cardboard Sculpture
Cardboard is an inexpensive and versatile sculpture material that can be cut, folded, layered, joined, and assembled to create three-dimensional forms.
In this project, you will explore cardboard as a sculpture material by creating an abstract organic sculpture.
Instead of trying to make a recognizable object, animal, or person, you will concentrate on shape, form, space, texture, and balance.
The challenge is to make all of these different elements feel like they belong together in one unified sculpture.
Accuracy matters! Small cutting errors can become much larger problems when several pieces have to fit together.
Materials:
- Corrugated cardboard
- Awl
- Cutting mat
- Metal ruler
- Utility knife
- Pencil
- White glue and brush
Learning objectives
- Safely cut cardboard with a utility knife.
- Cut controlled straight and curved edges.
- Create organic shapes.
- Use slots to connect cardboard without glue.
- Create stable supports for a freestanding sculpture.
- Transform flat shapes into three-dimensional forms.
- Use positive and negative space.
- Create texture by revealing the corrugated interior of cardboard.
- Build relief through layering.
- Use visual balance to organize a three-dimensional composition.
- Consider a sculpture from multiple viewpoints.
You will learn several ways to manipulate and assemble cardboard, including cutting curves, creating slots, joining intersecting pieces, cutting negative spaces, exposing corrugation, layering cardboard, and transforming flat shapes into three-dimensional forms.
What Is an Organic Shape?
Organic shapes are irregular, free-flowing shapes often associated with forms found in nature.
Unlike geometric shapes such as perfect squares, triangles, and circles, organic shapes may have:
- curves
- uneven edges
- asymmetry
- changing widths
- unexpected contours
Your shapes do not need to represent anything specific.
Avoid making a recognizable animal, person, building, or object. Concentrate on creating interesting relationships between abstract shapes.
Visual Balance
Balance is a Principle of Design that describes how visual weight is distributed throughout a composition.
Balance does not mean that both sides must be identical.
An asymmetrical sculpture can still feel balanced.
A large simple shape on one side might be balanced by several smaller shapes on the other. A dark or heavily layered area might be balanced by an interesting negative space somewhere else.
As you build, continually look at your sculpture from different directions.
Ask yourself:
- Does one side feel too heavy?
- Is everything concentrated at the top or bottom?
- Are my shapes too similar?
- Do I have interesting spaces between the forms?
- Does the sculpture look interesting from more than one viewpoint?
- Does the sculpture feel visually stable even though it is asymmetrical?
Sculpture Requirements
Your sculpture must include all of the following:
1. One Large Main Organic Shape
Begin with one large piece of cardboard that will become the dominant element of your sculpture.
It should have an interesting organic contour rather than simply being a rectangle or geometric shape.
Think of this piece as the backbone of your composition.
2. Two Feet
Your sculpture must be freestanding.
Create two cardboard feet that attach to the main shape using slots.
The feet should be large enough to support the sculpture without becoming the dominant visual elements.
Test the sculpture for stability before continuing.
3. At Least Four Additional Organic Shapes
Create at least four additional organic cardboard shapes.
Vary their:
- size
- direction
- proportion
- contour
Attach these pieces using the slot construction method.
Do not simply glue all of your shapes onto the surface.
Allow some shapes to intersect the main form and extend into the surrounding space.
4. Use Slot Construction
A slot allows two pieces of cardboard to intersect and support each other.
Measure the thickness of your cardboard before cutting the slot. You can make a stencil to save time
The slot should be:
- approximately the same width as the cardboard
- straight (use metal ruler!!!)
- carefully cut
- deep enough to create a secure connection
Whenever possible, test the connection before making the slot larger.
You can always remove more cardboard. You cannot put it back.
5. Include Positive and Negative Space
In sculpture, the empty spaces are just as important as the solid material.
Positive space is occupied by the cardboard forms.
Negative space is the open space around and within those forms.
Your sculpture must include intentional negative spaces.
Cutouts
Cut one or more organic shapes completely out of your cardboard forms.
These openings should become part of the design rather than looking like accidental holes.
Consider repeating or echoing the shapes used elsewhere in the sculpture.
Poked or Pierced Holes
Use an awl to create groups or patterns of smaller holes.
You might:
- cluster holes together
- gradually change their size
- follow a curve
- repeat a pattern
- use holes to contrast with a larger cutout
Think about the holes as drawn marks made with empty space.
6. Include Layering
Add cardboard pieces directly onto the surface of other pieces to create relief and depth.
Layering can be used to:
- repeat a shape
- create raised areas
- emphasize part of the sculpture
- create visual rhythm
- contrast thick and thin areas
Avoid simply decorating the entire surface with random pieces.
Use layering intentionally.
7. Reveal the Corrugation
Cardboard has a hidden texture inside it.
Carefully remove sections of the outer paper layer to reveal the corrugated structure underneath.
You can expose:
- strips
- organic shapes
- edges
- repeated areas
- small sections
Think about how the direction of the corrugation becomes another visual element in your sculpture.
The material itself becomes part of the design.
8. Add a Three-Dimensional Form
Most of your sculpture begins with flat cardboard shapes.
Now transform cardboard into a three-dimensional form.
For example, create a simple spherical form using two circles that intersect through slots.
Add another slot so the completed form can attach to your sculpture.
You may also develop another three-dimensional solution using intersecting cardboard pieces.
Your 3-D form should project into space and become part of the overall composition rather than simply being attached as an afterthought.
examples:

steps
Step 1: Experiment With Curves

Practice cutting several curved lines on scrap cardboard.
Unlike cutting a straight line against a metal ruler, curved cuts must be made slowly and with control.
Move slowly. Turn the cardboard when necessary.
The goal is a smooth edge rather than a series of short, jagged cuts.
Go over the pencil line with a sharp blade. Do not cut through with the first cut.

Place the cardboard on a cutting mat.
Either make several passes with the blade or cut through the cardboard and slowly rotate it as you go.
Step 2: Design the Main Shape

Draw a large organic shape on your cardboard.
Consider the overall silhouette. Avoid tiny bumps and complicated details that will be difficult to cut cleanly.
Cut the shape carefully.
Step 3: Make It Stand

Design two feet.
Determine where the feet will connect to the main form.

Measure and cut the slots. Make a stencil to save time.
Attach the feet and test the sculpture. Before moving forward, your main structure should stand securely on its own.
Step 4: Add Intersecting Shapes
Design at least four additional organic shapes.
Before cutting slots, hold each shape against the sculpture and experiment with:
- location
- direction
- angle
- height
Once you find an interesting position, determine where the slots need to be cut. Continue adding shapes while checking the sculpture from all sides.
Step 5: Create Negative Spaces
Add cutouts and pierced holes. Do not wait until every inch of your sculpture is filled.
Negative space should become an active part of your composition.
Step 6: Add Layers and Texture


Add raised cardboard details to selected areas.
Reveal corrugation in other areas.
Look for opportunities to repeat shapes, lines, and textures so the different parts of your sculpture feel connected.
Step 7: Construct a 3-D Form


Create at least one three-dimensional cardboard form using intersecting pieces. The two shapes should have different outlines, but have the same height. The slots should be cut halfway in both.
Attach it securely to the sculpture using a slot.
Step 8: Evaluate the Composition
Place your sculpture on a table and slowly walk around it.
Look at it from:
- the front
- both sides
- the back
- slightly above
- eye level
Identify areas that feel too empty, crowded, heavy, or repetitive. Make final adjustments to improve visual balance and unity.
Final Checklist
Before considering your sculpture complete, check that you have:
- One large main organic shape
- Two slotted feet
- A freestanding, stable sculpture
- At least four additional organic shapes
- Shapes connected using slots
- Large negative-space cutouts
- Pierced/poked holes
- Layered cardboard details
- Exposed corrugated cardboard
- At least one constructed 3-D form
- Variety in shape and size
- Interesting positive and negative spaces
- Visual balance
- A composition that works from multiple viewpoints
- Clean, controlled craftsmanship
Assessment
Cardboard Construction
Cuts, slots, intersections, and attachments demonstrate control of the material.
Craftsmanship
Edges are intentionally cut, connections are secure, and glue is used neatly where necessary.
Use of Space
The sculpture demonstrates thoughtful use of positive and negative space.
Variety of Techniques
The sculpture includes slot construction, cutouts, pierced holes, layering, exposed corrugation, and constructed 3-D form.
Composition & Balance
Shapes, forms, spaces, textures, and directions create a visually balanced and unified composition.
Three-Dimensional Thinking
The sculpture is designed to be viewed from multiple directions rather than functioning as a flat design standing upright.
Creativity & Problem Solving
The student experiments with the possibilities of cardboard and makes thoughtful decisions while constructing the sculpture.
Parcourez les avantages proposés sur https://winouienligne.com/ et découvrez un casino pensé pour le public francophone.