


wire portrait
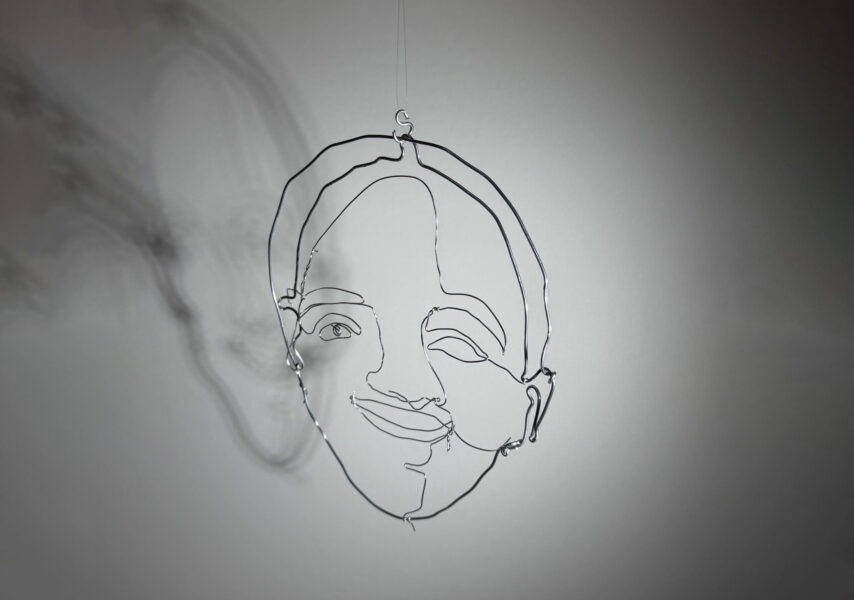
A portrait does not always need shading, color, or a solid surface to communicate a person’s identity.
In this project, you will transform a photograph of yourself into a wire self-portrait sculpture.
You will begin by studying the contours of your face and identifying the most important lines that describe your facial features, expression, and personality.
Then you will bend and shape wire to recreate those lines in space.
Your challenge is to create a recognizable self-portrait using line as the primary sculptural element, while exploring positive and negative space, overlapping, and depth.
WI State Standards:
- AA Cr10h
Investigate: Engage in critical thinking, problem solving, and research through elements and principles of art and design studio practices and processes.
(aesthetics / problem solving) - AA Cr11h
Plan: Formulate original concepts by practice, experimentation, and revision. (planning/experimentation) - AA Cr12h
Make: Create works of art that introduce students to media, care of tools, and basic craftsmanship skills.
(skills)
Learning objectives
- creative project: planning and executing
- conditioning clay
- following the process
- wheel throwing
- glazingObserve and simplify facial features from a photographic reference.
- Identify essential contour lines and expressive details.
- Understand the difference between contour drawing and continuous-line drawing.
- Translate a two-dimensional drawing into a wire sculpture.
- Safely bend, twist, and connect wire.
- Use positive and negative space as part of a composition.
- Create depth through overlapping and positioning wire.
- Develop a recognizable portrait using limited visual information.
- Demonstrate craftsmanship and creative problem-solving.
Artist Inspiration: Alexander Calder


American artist Alexander Calder explored the possibilities of drawing with wire. His portraits use bent and twisted lines to suggest facial features, expressions, and personality.
Rather than modeling solid forms, Calder created open structures in which the surrounding space becomes part of the sculpture.
His work demonstrates that a few carefully placed lines can communicate a surprising amount of visual information.
Materials
- Printed self-portrait photograph, preferably 8.5 × 11 inches
- Tracing paper or clear acetate
- Permanent marker
- Soft, bendable aluminum wire (approximately 14–16 gauge for the main structure)
- Wire cutters
- Needle-nose and round-nose pliers
- Masking tape
- Optional thinner wire for attaching details
- Display base
Project Requirements
Your completed wire self-portrait must include:
–
- A recognizable likeness based on your own photograph
- An identifiable head shape and hairstyle
– - Essential facial features: eyes, nose, mouth, and ears where visible
- A simplified contour drawing used as a construction guide
– - Wire bending, shaping, looping, and twisting techniques
– - Intentional positive and negative spaces
– - Secure connections without excessive wrapping
– - At least two areas that extend forward or backward to create depth
– - A finished sculpture that maintains its shape when lifted or displayed
– - Careful craftsmanship and safe wire ends
examples:

STEPS
Step 1: Simplify the Portrait
Place tracing paper over your photograph, or use a permanent marker on a printed copy.
Identify the most important lines that describe your face.
Concentrate on the outside contour, hairline, eyebrows, eyes, nose, mouth, and distinctive features.
Do not trace every detail.
Your goal is to simplify the photograph into a clear line drawing that can be recreated with wire.
Avoid shading and filled-in areas. Think about how each feature could be represented with a single line or a simple loop.
The contour drawing a required planning step. Show me your simplified tracing before receiving wire.
Step 2: Plan the Wire Path
Study your contour drawing and decide where your wire should begin.
Try to connect as many features as possible with one continuous length of wire.
Plan where the wire will:
- Bend to create a contour
- Form a loop to describe a feature
- Cross or overlap another line
- Wrap around another section to secure it
- Continue from one feature to another
You may use additional pieces of wire when necessary, but avoid unnecessary connections.
The goal is not to use the most wire. It is to communicate the most information with the fewest lines.
Step 3: Practice Wire Techniques
Before beginning your portrait, experiment with scrap wire.
Practice creating smooth curves, sharp bends, loops, spirals, and twisted connections.
Learn how to use pliers to control small details and how to secure one piece of wire around another.
Wire safety: Always cut wire with appropriate cutters, keep sharp ends pointed away from yourself and others, and bend exposed ends inward. Wear eye protection when cutting wire.
Step 4: Begin Constructing Your Portrait
Place the wire over your contour drawing and begin bending it to follow the lines.
Use small pieces of masking tape to temporarily hold the wire against your drawing.
Start with a major contour, such as the head shape, jawline, or hairstyle.
Work slowly, comparing the wire to the drawing as you go.
You may need to straighten and reshape sections several times.
Avoid making extremely tight bends unless they are necessary for the design.
Step 5: Construct Facial Features
Continue shaping the wire to describe the eyes, nose, mouth, and other important features.
Use loops and carefully placed bends to transition between different parts of the face.
When the wire needs to connect to an existing section, wrap it securely around that section.
Try to maintain the simplicity and flow of your original drawing.
Remember that a portrait does not need every detail to be recognizable. Proportion and placement are often more important than complexity.
Step 6: Create Depth
Carefully lift your portrait away from the drawing.
Experiment with bending selected areas slightly forward or backward.
For example, the nose might project forward, while the ears or hair extend backward.
These small changes transform a flat wire drawing into a sculpture that occupies three-dimensional space.
Do not bend everything randomly. Use depth intentionally to emphasize the structure of the face.
Step 7: Refine and Display
Examine your sculpture from several angles.
Check that the features are recognizable and that the connections are secure.
Adjust any areas that have become distorted.
Make sure no sharp wire ends are exposed.
Choose a display method that complements the sculpture. You might mount it on a base, suspend it, or position it in front of a contrasting background.
Experiment with lighting to observe the shadows created by the wire.
Photograph the finished wire portrait against a white background with strong directional lighting.
The resulting shadows can become a second artwork, showing how a three-dimensional line sculpture produces a two-dimensional image.
Assessment
- Observation and Likeness: The portrait captures recognizable facial characteristics, proportions, and expression.
- Line Quality: Wire lines are purposeful, controlled, and visually expressive.
- Construction Techniques: The student demonstrates successful bending, looping, twisting, and connecting techniques.
- Use of Space: Positive and negative spaces are thoughtfully organized, with intentional three-dimensional depth.
- Craftsmanship: Connections are secure, sharp ends are addressed, and the sculpture maintains its intended shape.
- Creativity and Problem-Solving: The student successfully translates a photographic portrait into a simplified wire construction.
Reflection Questions
1. Which facial features were most important in making your portrait recognizable?
2. What details did you eliminate from the original photograph, and why?
3. How did working with wire change the way you thought about drawing?
4. How did you use negative space in your portrait?
5. Which part of the sculpture was most challenging to construct?
6. How did you create a sense of depth?
7. What would you change if you created another wire portrait?